

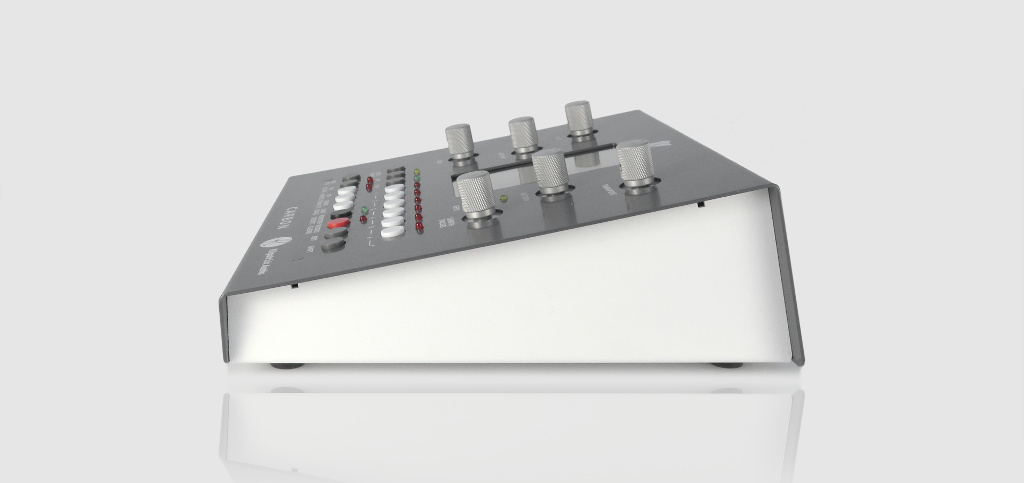
CARBON
User Manual - firmware ver. 1.14 and later
Download a PDF version of the manual here: carbon-manual.pdf
Note that PDF manuals are automatically generated from webpages. Links and embedded media will not be accessible. For the full experience visit our website: www.kilpatrickaudio.com
Manual Sections
- Introduction
- Precautions
- Getting Started
- User Interface
- Sequencer
- Song Mode
- Arpeggiator
- Loading and Saving Songs
- Understanding the CV/Gate Outputs
- MIDI Menu
- System Menu
- Clock Menu
- Swing Menu
- Tonality Menu
- MIDI Remote Control
- Interface Mode
- Tips and Tricks
- Updating Firmware over USB
- USB Host Port Details
Introduction
Thank you for buying CARBON, a unique and powerful sequencer. This manual will help get you started with the many features built into CARBON. Keep in mind that this is a living document and will be updated as new features are added, or to make corrections, clarifications or to add more detailed information.
Precautions
Please handle your CARBON sequencer with care. It is made to be used, but please don't spill your coffee into it or drop it on the floor. Treat it with care and it will last a long time. We offer service on all our products regardless of whether they are inside the warranty period or not, so if you have trouble at any time please ask us and we will do what we can to help you.
CARBON comes with a 24V power supply that has been specially selected for high quality. Please do not use any other power supply with your unit. To replace a lost power supply or to upgrade a US model to one with interchangeable plugs for many countries, please visit our online store.
Firmware Bugs
Every piece of software has bugs, and CARBON is no exception. We do our best to be responsive to customers, but your requests will go a long way if you are polite and give us all the info we need to reproduce your problem. Hardware issues should be dealt with via our support page.
CABON is an open source project so you are free to extend or hack on the code as you like. You can download the source code here. Please report any bugs to us directly. We also have a repository on GitHub if you wish to clone via git or make pull requests: CARBON repo on GitHub
Note: Make sure you are running the latest firmware before reporting a bug. The problem you are experiencing might have been fixed.
USB Compatibility Policy
We have built CARBON from the ground up to act as both a class-compliant USB host and device. Both host and device code has been developed through use of the official USB MIDI specification as well as by testing and debugging with various USB devices and computers with different operating systems.
The USB implementation works well for us, but it might not work for you. If not, please file a bug report and describe which device, computer type or operating system is not working for you. Note that not all class-compliant devices are really 100% compliant and may not work with CARBON.
For more information and specific details, see the USB Host Port Details section at the end of this document.
The following USB configurations may not work:
- A device connected via a hub cannot be used - This is a hardware limitation of CARBON. Please do not use USB hubs or devices that contain integrated hub chips. Many multi-function USB devices that contain a controller as well as sound card contain a USB hub.
- A device that draws too much current cannot be used - Some devices violate the USB power specification. The USB host port is overcurrent protected and will shut off if an overcurrent or short circuit condition exists. Devices which require more than 500mA should not be used with CARBON.
- Do not use CARBON to charge mobile phones or other devices - The USB host port in CARBON is designed for low-power USB MIDI controller which draw less than 500mA. Many phones and USB power banks will test USB ports to see how much current they can deliver for maximum charge rate. They often ramp up to several amps. These type of devices should not be with CARBON.
Getting Started
Settings
CARBON is designed to have most functions only a single button press away. No menus have submenus, and the most common functions are designed to be most easily accessible. Menu options are grouped by their type: MIDI functions, clock functions, tonality functions, and so on. Some settings are global to a song and some are specific to a scene / track combination.
Selecting Things
The buttons labeled 1 through 6 are used for selecting tracks and scenes. You can use them in the following ways:
- selecting a track - press to select a track
- selecting multiple tracks - press and hold to select a track, then press other tracks to select multiple
- muting / unmuting a track - hold SHIFT and press a select button to mute or unmute a track
- changing scenes - hold SCENE and select to change scenes
- reset playback only on a single track - hold a select button, hold SHIFT and press RESET to reset the playback on only one track
Whenever a setting affects a scene and/or track, the current track settings will be displayed in the area at the bottom of the screen. You can quickly check the setting of each track by choosing a different track. You can also perform the same operation on multiple tracks at the same time by multi-selecting tracks and then performing the operation. Not all operations make sense like this, but most track parameters can be edited on multiple tracks at the same time.
Note: When multiple tracks are selected at the same time only the first selected track is displayed. Changes made to multiple tracks, parameters will take the value of the first (displayed) track when being chanegd.
Rear Panel Connections
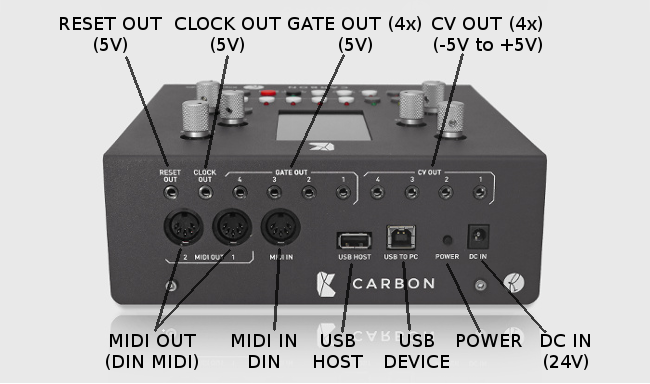
CARBON supports analog CV/gate, MIDI and USB MIDI connections so that you can make the most of your existing gear. All connections can be used at the same time. The function of the rear panel jacks and controls are as follows:
- RESET OUT - Sends 5V pulses when the song or sequence is reset. Can also be used to send the metronome to an external device. Output voltage is either 0V (off) or 5V. (on)
- CLOCK OUT - Sends 5V pulses to synchronize other equipment with CARBON. The output rate can be configured or output disabled in the CLOCK menu. Output voltage is either 0V (off) or 5V. (on)
- GATE OUT - There are four GATE OUT channel which produce 5V gate signals according to the CV/gate pairing mode selected. Normally used together with the CV OUT of the same number. Output voltage is either 0V (off) or 5V. (on)
- CV OUT - There are four CV OUT channels which produce analog control voltages. (CVs) Can be used to send pitch or control voltages depending on the CV/gate pairing mode selected. Normally used together with the GATE OUT of the same number. Output voltage can range from -5V to +5V and can be set to track in either 1V/octave or 1.2V/octave mode for pitch.
- MIDI OUT - There are two MIDI OUT jacks which produce different signals. Can be used to control external MIDI equipment like keyboards, synths and drum machines.
- MIDI IN - There is one MIDI IN jack which accepts MIDI signals. Can be used to receive MIDI from an external keyboard or other instrument, to sync CARBON to an external drum machine and so on.
- USB HOST - The USB HOST port can power and host many class compliant USB MIDI devices such as keyboards and MIDI controllers to control CARBON. The port is limited to 500mA and cannot be used with hubs or devices which have internal hubs. Due to the wide variety of USB devices, and quirks of USB, not all devices will work with CARBON.
- USB DEVICE - The USB DEVICE port (labeled USB TO PC) can be used to connect CARBON to a computer. CARBON will act as a class compliant USB MIDI device and has been tested with Windows, OS X and Linux. You can send and receive MIDI data. This port is also used for upgrading the factory firmware to a newer version.
- POWER - The power button is used to turn on and off CARBON and set it into alternate modes.
- DC IN - The DC IN jack takes 24V from the power supply. It is a centre-positive 2.1mm connector. Please do not use a power supply other than the one supplied with CARBON. Other supplies could damage the unit.
Powering Up
CARBON has three power modes: off, on and interface mode. When you plug in CARBON it will be off. Press the rear power button to turn it on. This is the normal mode for operating CARBON as a stand-alone sequencer. By pressing the power button again the screen will shut off and the encoders will light up purple. This is called interface mode. In this mode you can use CARBON as a CV/gate and MIDI interface for your computer. All functions are controlled via MIDI over the USB device port from the computer.
When you turn on CARBON it will load the last song that you were using, or a blank song if you are using CARBON for the first time. Before you can hear anything you need to set up some MIDI or CV/gate devices. Use the MIDI menu to configure MIDI or CV/gate output settings for tracks. Once you have a synth connected you should be able to hear sound when playing back a track. To play live notes from a keyboard press the LIVE button and select a track or tracks to echo the MIDI inputs to these tracks.
User Interface
Since most controls on CARBON directly access internal functions, it's best to start by describing each of the controls and what they do in various modes. If a button has a shifted function this name will be displayed inside round brackets () underneath the main function name.
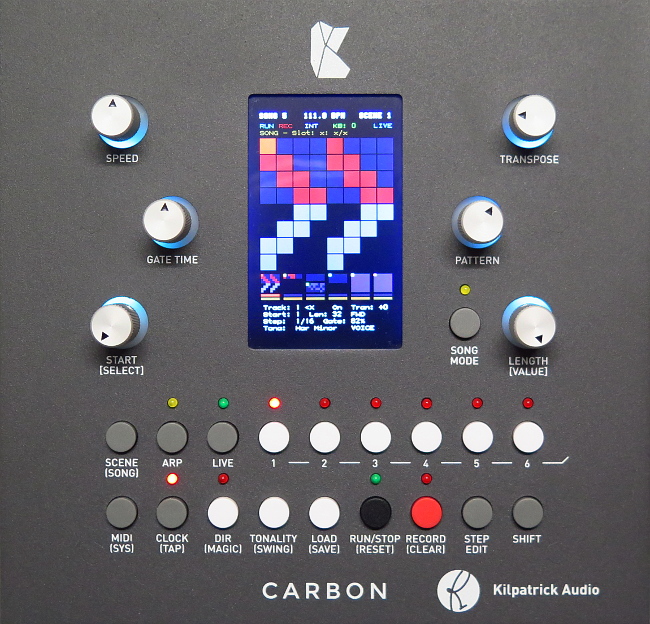
Buttons
Below is a list of button functions that work in the normal (main screen) mode. In certain situations such as loading or saving a song, some of these functions may be disabled. Also, in the step edit and song edit modes some buttons are disabled or used for other functions as documented elsewhere in this manual.
| Control | Normal Function | [Shifted Function] |
|---|---|---|
| SCENE (SONG) |
hold and press buttons 1-6 to change scenes, or, hold, then press SHIFT and press buttons 1-6 to copy current scene |
view / edit song list |
| ARP | turn on and off ARP mode on a track | enter ARP menu without changing arp state |
| LIVE | toggle LIVE mode on and off on a track | toggle keyboard transpose mode |
| Select 1-6 | select one or more tracks / select scenes | mute / unmute a track |
| MIDI [SYS] |
access MIDI functions for song / tracks | access system menu for global system settings |
| CLOCK [TAP] |
access clock menu for adjusting track, clock and metronome | tap tempo |
| DIR [MAGIC] |
flip the direction of playback on a track | seed the active region of a track with random notes |
| TONALITY [SWING] |
adjust tonality / scale / note-related settings | adjust clock swing |
| LOAD [SAVE] |
load or clear a song | save a song |
| RUN/STOP [RESET] |
start or stop the sequencer | reset the playback position on all tracks |
| RECORD [CLEAR] |
enable recording on a track | clear the active region on a track |
| STEP EDIT | edit notes on a track | edit patterns |
| SHIFT | double-tap to exit a menu or mode | |
| SONG MODE | enable or disable song mode | enable or disable song mode |
Encoders
Encoders are used in the normal mode (main screen) and are also used in the step edit and song edit mode. The functions in each of these modes in shown below.
| Control | Normal | Step Edit Mode | Song Edit Mode | Pattern Edit Mode |
|---|---|---|---|---|
| SPEED | coarse adjust tempo fine adjust tempo (SHIFT) |
adjust start delay of note | coarse adjust tempo fine adjust tempo (SHIFT) |
coarse adjust tempo fine adjust tempo (SHIFT) |
| GATE TIME | adjust gate time override on track adjust gate time override fine (SHIFT) |
adjust gate time of note | no action | adjust gate time override on track adjust gate time override fine (SHIFT) |
| START [SELECT] |
adjust track start pos adjust menu selection (menus) adjust step record pos (step record) |
adjust step edit pos | adjust song mode cursor pos | adjust pattern edit pos |
| LENGTH [VALUE] |
adjust track length adjust menu value (menus) adjust track step length (SHIFT) |
adjust step edit note velocity / CC value | adjust song mode playback length | adjust step enable / disable |
| PATTERN | adjust gate pattern on track | adjust ratchet mode | adjust scene | adjust gate pattern on track |
| TRANSPOSE | adjust track transpose | adjust note / CC | adjust KB trans | adjust track transpose |
Navigating Menus
In most menus there are only two controls that you need to know about: [SELECT] and [VALUE] These are the lower two encoders which are also labeled START and LENGTH. When a menu is active in the bottom part of the screen, these two controls are used to navigate options and adjust values.
- Navigate - Turn the [SELECT] knob to choose between different parameters in a menu
- Edit Value - Turn the [VALUE] knob to edit the value of the displayed parameter
GUI Display
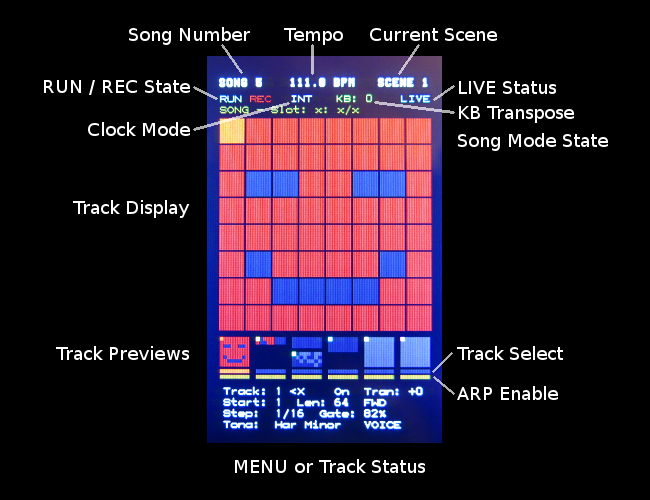
The display on CARBON follows a uniform and consistent layout. The screen area is divided into four sections:
- Top Bar - shows song information and sequencer status
- Track Display - shows the current track, or first of multiple selected tracks
- Track Preview Displays - shows small previews of all tracks
- Track Status / Menu Display - shows information about the current track, or first of multiple selected tracks - also shows menu displays when a menu is active
Top Bar
The top bar shows the following information. If an item is drawn in a dim colour this means that the function is disabled.
- currently loaded song number
- song tempo in BPM
- current scene number
- run state of the sequencer
- record state of the sequencer
- clock status - internal or external synth
- current keyboard transpose offset for voice tracks
- live play status
- song mode playback status
Main Track Display
The main track display shows the current track, or the first of multiple selected tracks. This includes the selected active region, whether there are events on each step, and the currently selected pattern.
Several types of information can be viewed on this display:
- start and length - the region of steps selected for playback is shown in a bright red colour or light grey colour if a step has no note on it
- current step - the current step on a track is shown in a unique colour and moved when playback is running - each track uses a unique colour
- step data status - if a step contains data it will be shown in a lighter / brighter colour than if it is blank
- step record / step edit position - during step record or step editing a step will light up yellow to indicate the current step record or step edit position
- pattern gate status - the major feature of CARBON is the gate patterns which can be used to modify a sequence - the gate pattern will light up active steps in red, otherwise a darker grey colour will be used
Track Preview Displays
The track preview displays show the same information as the main track display in a miniature form. Below these displays are two solid bars. The top bar indicates whether a track is selected. This mirrors the LED indicators on the front panel. The bottom bar indicates whether an arpeggiator is enabled on a track.
Track Status / Menu Display
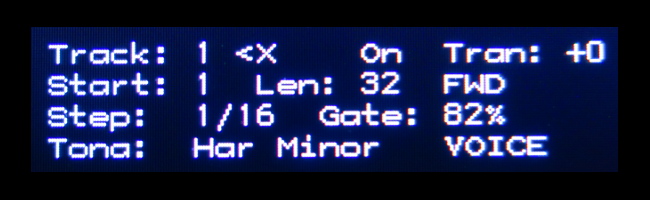
The track status is normally shown in this portion. This includes most commonly needed parameters of a track and include:
- track number
- whether a bias track is controlling this track - shown as <X on the above display, indicating that no bias track is enabled
- the current track mute state (either
MUTEorON) - the track transposition in semitones
- the active region start and length
- the playback direction (either FWD or REV)
- the step length as it relates to the master clock - shown in standard note values
- the gate length master override - how the master gate setting scales notes on this track
- the tonality scale setting
- the track type - either
VOICEorDRUM
Sequencer
The sequencer is the heart of CARBON. At the core of the CARBON sequencer is a stable and accurate MIDI clock, and a step sequencer architecture with space for up to six MIDI events per step on six tracks. Sequences can be recorded in step-record mode, in real-time record mode, or directly entered or edited through the STEP EDIT function. Editing can occur even when the sequencer is running.
There are a few key points about the CARBON sequencer:
- all sequences are essentially step sequences
- sequences are loop-based
- real-time recordings are quantized to the nearest step position
- each track can be of a different length
When thinking about how CARBON can be used for your music explorations, imagine having six powerful step sequencers, each with an output optionally connected to an arpeggiator. These sequencers can be programmed and manipulated easily, and are all run from the same master clock. Additionally by using the BIAS track settings, one track can affect the playback of another, just like the classic step sequencer compositional tricks used back in the 1970s.
Song Data
CARBON can store 64 songs in its internal flash memory. Each song is the same size and has space pre-allocated for the maximum number of events, song list items and settings. Each song consists of six tracks each with 64 steps. A step can store up to six MIDI events (notes or CCs) and several other parameters. Each track stores a number of other parameters such as the step length, transposition, start position, length of playback, and more. Most of these parameters make up a scene. There are six scenes in each song, allowing quick changes of most track parameters while a song is playing. This enables quick changes between sections of a song. The notes on each step are common to all scenes.
In addition to the track parameters there are also a number of song-wide parameters such as MIDI and clock settings. These are stored per-song so you can have maximum flexibility to set up CARBON differently in different situations.
When you power up CARBON the previous song that was used will be loaded automatically. Because songs can only be saved while the sequencer is stopped, there is no auto-save function. You must manually save to the song or your changes will be lost if you turn off or unplug the unit.
Patterns
One of the key concepts of CARBON is that of patterns. This concept is drawn from the original K4815 Pattern Generator module which makes extensive use of patterns both as a visual as well as rhythmic element. This visual component offers an innovative way of creating music.
Imagine a sequence as a series of notes that have been recorded or somehow entered into a track. Normally each of the notes in the sequence will play as the sequencer advances. But through the use of patterns, some steps can be muted as the sequencer plays. Patterns quickly enable and disable different steps in a sequence to create quick, non-destructive melodic and rhythmic variations. They are designed to be both visually interesting and musically useful. It's also possible to edit the internal patterns to create your own variations.
Patterns are non-destructive meaning that underneath all steps still exist. A pattern simply temporarily mutes some steps so their events won't be generated. To return to the original sequence, dial in the highest numbered pattern. This is called the as recorded pattern and it will activate all steps as per the original sequence.
Editing Patterns
CARBON ships with 31 unique patterns plus the AS-RECORDED pattern which represents the notes recorded into the current track. Normally these patterns are intended to be used as a quick way to change a sequence. However if you want you can edit these patterns to your liking. Edited patterns are stored automatically after an internal timeout so please wait about a minute or so after editing a pattern before you power down or unplug CARBON.
Note: Patterns are recorded globally and are the same for all songs.
To edit a pattern do the following:
- Enter Pattern Edit mode by holding SHIFT and pressing the STEP EDIT button. The menu display will show the current pattern and step.
- Choose the pattern to edit with the PATTERN control.
- Choose the step to edit with the SELECT control.
- Enable or disable the step with the VALUE control.
- If you wish to restore a pattern to the factory default hold SHIFT and press CLEAR to restore it.
Start and Length
Each track operates independently of the others with regards to the region of steps played back. This enables complex polyrhythms or other interesting effects since all tracks can run at different speeds and with different lengths. This permits each track to loop at a different point from the others.
- START - the starting step on a track when playback is started or reset
- LENGTH - the number of steps to play on a track before it is looped
Recording
Recording will store note and CC information into the steps of a track. Before recording choose which region you wish to record by setting the START and LENGTH controls. If you wish to add notes to the existing recording, simply record normally. If you wish to record new events to a region, make sure you clear it first by holding down SHIFT and pressing RECORD to clear the region.
Step Recording
Step recording works when the sequencer is stopped. When you press RECORD the record LED will blink indicating that the system is armed and ready to record. Pressing a note on your keyboard will start the recording process. You can record multiple notes on a step by pressing and holding multiple notes. Once all notes are released the sequencer will advance to the next step. The current record position is shown with a yellow box on the current step. You can change the record position during recording by using the START control.
To insert rests, just move the START control to adjust the record position or press the damper pedal on your MIDI keyboard.
The step recording note length is based on the current step length. If you want to adjust it you can temporarily adjust the GATE TIME control. When the track gate time is set to 100% notes will be the length of the step. You can raise or lower this control to generate notes of different lengths. Make sure to restore the gate time back to 100% after recording to hear the actual results.
Real-time Recording
Real-time recording mode works when the sequencer is running. In this mode recorded notes and CCs will be quantized to the nearest step. Lengths of notes can be recorded and can be any length. To start real-time recording mode press RECORD while the sequencer is running. The RECORD LED will blink until the next repeat of the selected region. As soon as the sequencer loops around the RECORD LED will be solidly lit and recording will be in progress. Each time the loop ends the data recorded on the last loop will be added to the track and played automatically. If a recording is cancelled by turning off recording before the region is ended or by stopping the sequencer the partially recorded section will be discarded and the previous step data maintained.
Step Editing
Step editing allows you to manually edit or enter notes and CCs into steps. You can clear individual steps or modify the contents of an existing step. By pressing the STEP EDIT button the current edit step is previewed. You can tap the STEP EDIT button multiple times to audition the current note.
Note: The step will not be auditioned if the sequencer is running.
The following controls and actions are part of EDIT mode:
- SHIFT + CLEAR - clears the current step
- SPEED - adjusts the start delay of notes on a step
- GATE TIME - adjusts the length of notes on a step - hold SHIFT while adjusting to move by smaller steps
- [SELECT] - selects the step to edit
- SHIFT + [SELECT] - adjusts the cursor to edit individual events on a step instead of the entire step
- [VALUE] - adjusts the velocity of notes or the value of CCs - hold SHIFT to enter a CC instead of a note
- PATTERN - adjusts the ratchet repeat for notes (1-8 times)
- TRANSPOSE - adjusts the note or CC for events on a step
Step Edit in VOICE vs. DRUM Modes
When a track is set to VOICE or DRUM modes, the behaviour of the step editing function is slightly different when entering notes from a keyboard. The two modes work as follows:
- VOICE Mode - When a new note is pressed on the keyboard, all notes on the step are replaced. To enter a chord, hold down all notes at once.
- DRUM Mode - When a new note is pressed on the keyboard, existing notes are retained on the step. If a note of the played pitch already exists on the step, it is replaced with the played version at its new velocity.
Editing Individual Events on a Step

By holding SHIFT and adjusting the [SELECT] control it is possible to individually select a single event on a step. Doing this moves a cursor onto the screen which allows the six step events to be individually edited.
Holding SHIFT and turning [SELECT] all the way to the left the cursor will disappear and any changes you make will affect all events on a step.
Entering Notes on a Step
You can enter notes on a step by simply turning the TRANSPOSE control. This will edit existing notes or add a new note if the step is unused. By moving the cursor as shown above, up to six individual notes can be entered.
Entering CCs on a Step
A CC can be entered on a step. This works like entering notes except that you must hold down SHIFT while turning the TRANSPOSE control. In this mode TRANSPOSE changes the actual CC number, while the [VALUE] control changes the CC value.
Editing with a Keyboard
You can enter events quickly from a keyboard when in step edit mode. Simply press a key or a chord when editing a step to replace the contents of the step with new data. This is the fastest way to manually enter notes and CCs.
Scenes
Scenes enable most track settings to be quickly altered. By using up to six scenes it is possible to quickly change between sections of your song, or variations using different parameters. Most settings of a track are part of the scene. Exceptions are MIDI port settings, keyboard split settings and track type. When a scene is changed the settings for all tracks (as indicated below) are changed in sync.
The following parameters are stored in a scene for each track:
- step length
- tonality
- track transpose
- bias track settings
- track playback start position
- track playback length
- gate time
- pattern type
- direction
- mute setting
- arp type
- arp speed
- arp gate time
- arp enable state
Changing Scenes
To change scenes hold down the SCENE button and use of the selector (1-6) buttons. The scene will be changed either immediately (when the sequencer is stopped) or at the next beat time or loop end on track 1. (when the sequencer is running) Scene changes are synchronized to musical time to make it possible to smoothly transition between different settings.
Copying Scenes
Once you have a scene going the way you like, you might want to copy it so you can make changes to some of the settings. To copy the current scene to a new scene simply hold down the SCENE button. Instead of just pressing a select button (1-6) to change scenes, hold down SHIFT and then press a select button to copy the current scene to the selected scene. All scene-specific settings will be duplicated to the new scene.
Live Control
The LIVE button on CARBON gives you access to two different modes which can be useful during performance. You can use one of the two modes at a time:
LIVE
Pressing the LIVE button enables or disables LIVE mode. This mode allows you to play over the current track(s) using a keyboard. When activated, any playing notes on the track will be muted, allowing you to take over from the sequencer and do a solo, etc. while temporarily muting playback. When LIVE is enabled, the backlight LEDs will turn green, and the LIVE icon in the top bar will be lit up.
Note: When a track is set to DRUM mode, live input is always available.
Autolive Function
If you want to play your synths even when a sequence is playing, this is not normally possible on VOICE tracks. The MIDI Autolive mode allows tracks to be auditioned even when LIVE mode is off, and when the sequencer is playing. Enabling LIVE mode will still mute playback in the normal way when this mode is active. MIDI Autolive mode is adjusted in the MIDI menu.
Keyboard Transpose (KB Trans)
Pressing SHIFT + LIVE enables keyboard transpose (KB trans) mode. This allows you to transpose the currently playing tracks up or down with a MIDI keyboard. Tracks can be transposed a maximum of +/-24 semitones. Only tracks set to VOICE mode will be transposed. DRUM mode tracks will not be affected. When activated the LIVE button will blink and the KB icon in the top bar will show the current transposition.
This function works the same as the song mode, where each entry in the song list will apply a keyboard transposition automatically. When entering SONG MODE the keyboard transpose will be reset.
Song Mode
Song mode enables you to schedule a number of scene changes to be made automatically instead of by hand. You can store up to 64 entries in the list. If a song contains a valid song list, the song mode will be activated automatically when you load the song.
A song list is made up of entries, each containing:
- scene to play / action - which of scene 1-6 will be played or end-of-song action to perform
- number of beats to play scene - how many beats to play the scene
- keyboard transposition to apply - what transposition to add to voice tracks
Editing the Song List
To edit the song list press SHIFT + SONG to access the list. The list can be edited at any time, even when the song mode is disabled.
Editing is performed as follows:
- START - adjust the cursor position in the list
- SHIFT + START - insert a blank entry in the list
- LENGTH - adjust the playback length for the scene
- PATTERN TYPE - adjust scene to play
- TRANSPOSE - adjust keyboard transpose for the scene
- SHIFT + RECORD - remove the current entry
Adding an Entry to the Song List
Before you can make any changes to a song list entry, you need to create an entry. Use the PATTERN TYPE knob to select a scene to use. If the cursor is on a blank entry the entry will be populated with default data. You can then adjust the SCENE, LENGTH and TRANSPOSE settings using the controls as shown above.
End-of-Song Actions
Instead of selecting a scene on a song list entry, there are also two additional options: Reset and Repeat. Or you can simply enter nothing after the last scene in your song list. The behaviour of each mode is described below:
End-of-Song Actions
- No entry after last scene - Sequencer stops and song mode is disabled
- Reset - Song is started again from the top
- Repeat - Last scene entry is repeated forever
Using Song Mode
Song mode is enabled and disabled by pressing the SONG MODE button. When enabled the song mode will be set to play from the beginning of the song list. As the song plays the current status and number of beats will be shown in the top bar.
When playback of the song list finishes the SONG MODE LED will go out and the sequencer will continue to play the settings from the last entry in the song list.
Arpeggiator
There are six arpeggiators in CARBON, one for each track. These can be used as part of live performance, or during playback of notes from the tracks. When playing multiple tracks at the same time in LIVE mode, each arpeggiator runs independently even if it is receiving the same keyboard notes as other tracks.
When playback on CARBON is stopped, arpeggiators can be used in LIVE mode. The arps will free-run based on the current song tempo. Notes will start playing as soon as keys are pressed down on the keyboard. When CARBON is running, the arpeggiators will be synchronized to the internal clock. Notes will start at the correct time based on the arp speed setting and current clock position.
To turn on or off the arp on a track, press the ARP button. The arp menu will be displayed when the arp is enabled. To access the menu after the arp is started without changing the arp enable state, hold down SHIFT while pressing ARP to call up the menu again.
The arpeggiators have the following settings which can be adjusted from the ARP menu:
- Arp Type - Selects the arp type. Choices include various program choices and different numbers of octaves.
- Arp Speed - Selects the arp step speed. The speed is based on the song tempo.
- Arp Gate Length - Selects the length of the note gate.
Arpeggiator Types
| Arpeggiator | Description |
|---|---|
| Up 1 | Up arpeggio over 1 octave |
| Up 2 | Up arpeggio over 2 octaves |
| Up 3 | Up arpeggio over 3 octaves |
| Up 4 | Up arpeggio over 4 octaves |
| Down 1 | Down arpeggio over 1 octave |
| Down 2 | Down arpeggio over 2 octaves |
| Down 3 | Down arpeggio over 3 octaves |
| Down 4 | Down arpeggio over 4 octaves |
| Up/Down 1 | Up and down arpeggio over 1 octave - repeats end notes |
| Up/Down 2 | Up and down arpeggio over 2 octaves - repeats end notes |
| Up/Down 3 | Up and down arpeggio over 3 octaves - repeats end notes |
| Up/Down 4 | Up and down arpeggio over 4 octaves - repeats end notes |
| Random 1 | Random note order within 1 octave range |
| Random 2 | Random note order within 2 octave range |
| Random 3 | Random note order within 3 octave range |
| Random 4 | Random note order within 4 octave range |
| Order 1 | Played note order within 1 octave range |
| Order 2 | Played note order within 2 octave range |
| Order 3 | Played note order within 3 octave range |
| Order 4 | Played note order within 4 octave range |
| Up/Down 1 NR | Up and down arpeggio over 1 octave - end notes not repeated |
| Up/Down 2 NR | Up and down arpeggio over 2 octaves - end notes not repeated |
| Up/Down 3 NR | Up and down arpeggio over 3 octaves - end notes not repeated |
| Up/Down 4 NR | Up and down arpeggio over 4 octaves - end notes not repeated |
| Repeat 1:0 | Repeat the held notes. |
| Repeat 1:1 | Repeat the held notes with alternating rests. |
| Repeat 2:1 | Repeat the held notes with two notes, one rest. |
| Repeat 3:1 | Repeat the held notes with three notes, one rest. |
| Repeat 4:1 | Repeat the held notes with four notes, one rest. |
| Up (Low) 1 | Up arpeggiator plays low note every other step. One octave range. |
| Up (Low) 2 | Up arpeggiator plays low note every other step. Two octave range. |
| Up (Low) 3 | Up arpeggiator plays low note every other step. Three octave range. |
| Up (Low) 4 | Up arpeggiator plays low note every other step. Four octave range. |
| Down (High) 1 | Down arpeggiator plays high note every other step. One octave range. |
| Down (High) 2 | Down arpeggiator plays high note every other step. Two octave range. |
| Down (High) 3 | Down arpeggiator plays high note every other step. Three octave range. |
| Down (High) 4 | Down arpeggiator plays high note every other step. Four octave range. |
Loading and Saving Songs
There is internal space for 64 songs to be stored in CARBON. Songs can only be loaded and saved when the sequencer is stopped. To load a song, press the LOAD button and select the song to load. To confirm press LOAD again and the song will be loaded.
To save a song hold SHIFT and press SAVE. Select the song number to save to. To confirm hold SHIFT and press SAVE again.
To clear the currently loaded song back to defaults press LOAD and adjust the SELECT encoder until Clear Current Song is displayed. Press LOAD again to confirm.
Understanding CV/Gate Outputs
The CV/gate outputs are designed to be super flexible. This means that there are a few extra settings that you need to adjust for things to work the way you want.
CV/gate outputs are always assigned and used together. That is, CV 1 and gate 1 always have the same function. Think of CARBON as having four CV/gate outputs: CV/gate 1-4
Pairing Modes
It is possible to map CV/gate outputs into different pairing arrangements. This allows them to work together for duophonic or polyphonic playing. To distinguish between the actual CV/gate outputs and the various logical pairs, CV/gate outputs are numbered 1-4, and the pairs are named A-D.
By default the pairing mode is ABCD, meaning that each of the CV/gate outputs is independent of the others. Other possibilities are AABC, AABB, and AAAA. The table below explains what happens with each of CV/gate outputs in each of the modes, but it's actually pretty simple to figure it out as you go along. Control of the pairing modes is set up in the SYS menu.
| Pairing Mode | Function | CV/Gate 1 | CV/Gate 2 | CV/Gate 3 | CV/Gate 4 |
|---|---|---|---|---|---|
| ABCD (default) | Each output independent | A pair | B pair | C pair | D pair |
| AABC | Duophonic + two independent | A pair (first voice) | A pair (second voice) | B pair | C pair |
| AABB | Two duophonic | A pair (first voice) | A pair (second voice) | B pair (first voice) | B pair (second voice) |
| AAAA | Polyphonic | A pair (first voice) | A pair (second voice) | A pair (third voice) | A pair (fourth voice) |
When assigning the output mappings for CV/gate outputs from tracks, the pair letter names are used. It's important to check that the particular pair you want to use is actually assigned. For instance, in all but the ABCD mode, there is nothing connected to the D pair, so if a track selects it, nothing would happen.
CV Output Modes
In addition to pairing, it's also possible to select what kind of event is sent to each pair. In the SYS menu it's possible to assign an output pair to: note, velocity or CC. The table below explains how each output mode works.
| CV Output Mode | Description | CV Function | Gate Function |
|---|---|---|---|
| Velocity | Key velocity is output. | Velocity as a proportional voltage. | Note gate. |
| Note | Pitch voltage is output. | Note (pitch) as a proportional voltage. | Note gate. |
| CC | A continuous controller (CC) value is output | CC value as a proportional voltage. | CC value as a threshold voltage. (0-63 = off, 64-127 = on) |
CV Scaling / Span Calibrate / Offset
When notes (pitch) values are output from a CV jack, a voltage is chosen based on a particular voltage representation of the note. The two choices are 1V/octave and 1.2V/octave. The 1V/octave standard is the most common type used on most analog monosynths, Eurorack systems, Kilpatrick Format systems and so on. The 1.2V/octave standard is used on Buchla systems.
By selecting the correct scaling, the pitches should sound correct with properly calibrated oscillators on the system. To account for small differences between CARBON and a particular oscillator, it is possible to independently adjust the scale span using the CV Span Calibrate function in the SYS menu. Increasing the number will make the output scale larger, and vice versa.
You can adjust the absolute offset voltage from the CV outputs when using them in note mode. This allows you, for instance, to match another CV source so that an oscillator can be swapped back and forth between several CV sources without retuning. Adjust the CV Output Offset function in the SYS menu to shift the absolute voltage up and down. It can be raised and lowered approximately 1 volt in either direction. Please note that the range of possible notes may be reduced when using this function since the analog output hardware has finite output range. The velocity and CC outputs cannot be shifted up and down.
CV Quick Setup
Follow these simple steps to get CV output configured on your CARBON. You can then go back and make changes to enable different modes as required. This process will set up the CV/gate outputs for individual / monophonic mode, and configure track 1 to output notes on CV/gate pair 1.
- In the SYS menu, set the CV/Gate Pairs to ABCD
- In the SYS menu, set the CV Output Mode on each output to Note
- In the SYS menu, set the CV Output Scaling on each output to 1V/oct
- Select track 1
- In the MIDI menu set track 1 Out Port A to CV/GATE
- In the MIDI menu set track 1 Out Chan A to CV A
- Notes on track 1 should now be output on CV/gate output pair 1
MIDI Menu
The MIDI menu allows you to adjust MIDI settings related to each track as well as several options which affect the entire song.
Track Setting
When displaying track-specific MIDI settings, change tracks with the selector buttons to view and edit settings for each track.
CARBON can send MIDI to two different destinations simultaneously from each track. This enables you to send to multiple instruments on different MIDI channels or ports at the same time. The two outputs from each track are labeled: A and B
- Program A - Selects the MIDI program change to be sent to the A output on the track.
- Program B - Selects the MIDI program change to be sent to the B output on the track.
- Out Port A - Selects the destination MIDI port for track output A.
- Out Port B - Selects the destination MIDI port for track output B.
- Out Chan A - Selects the MIDI channel / CV pair for track output A.
- Out Chan B - Selects the MIDI channel / CV pair for track output B.
- Key Split - Affects how this track will be controlled in LIVE mode when multiple tracks are selected. The track can be set to Left Hand, Right Hand or OFF. The split point is factory set to middle-C. The middle-C note will be assigned to the right hand when the split mode is enabled.
Song Settings
The following settings affect the entire song:
- Key Vel Scale - Velocity scaling for the keyboard input. This is applied to live playing or recording to a track.
- MIDI Rmt Ctrl - Enables or disables MIDI remote control.
- MIDI Autolive - Enables or disables MIDI autolive mode. (described in the Live Control section above.
System Menu
The system menu is used to adjust settings related to the entire song, or to access system-wide settings.
- Firmware Release - The current firmware version is shown.
- CV/Gate Pairs - Allows the pairing mode of the CV/gate outputs to be adjusted. This affects whether CV/gate outputs operate in monophonic or polyphonic mode.
- CV Bend Range - Adjusts the number of semitones of pitch bend on the CV outputs.
- CV Output Mode A-D - Adjusts the output mode used for CV/gate outputs on each pair.
- CV Output Scaling A-D - Adjusts the output type for CV outputs. (1V/octave, 1.2V/octave)
- CV Span Calibrate 1-4 - Adjusts the scaling of the CV outputs. This can be used to adjust the scale span when used with analog oscillators.
- CV Output Offset 1-4 - Adjusts the absolute offset of the CV outputs. This can be used if your oscillator cannot be tuned to the other instruments in your setup.
- Menu Timeout - Adjusts how long menus are held on the screen before the main status display returns. Settings from 1s to 59s are possible, or SHIFT EXIT. Tapping SHIFT twice will cancel out of a menu regardless of the timeout setting.
Clock Menu
The clock menu is used to adjust the step length on a track as well as song-wide settings such as metronome settings and clock output settings on the various ports. Clock outputs on MIDI and the CV clock output port can be set to a number of pulse-per-quarter. (PPQ) The standard MIDI clock rate is 24 PPQ.
- Step Length - Adjusts the step length of a track. This can also be adjusted when the menu is not displayed by holding SHIFT and turning the LENGTH knob.
- Metronome - Selects the output for the metronome. The metronome is used during recording and has the following settings:
- OFF - The metronome is not used.
- INTERNAL - The internal speaker is used.
- CV Reset - The RESET jack outputs pulses when the metronome should sound.
- Track 6 - A specific note is sent on track 6 when the metronome should sound.
- Metronome Len - Sets the length of the metronome sound. This can be used to affect the perceived volume of internal speaker or externally-controlled synth.
- MIDI Clock OUT Settings
- MIDI DIN 1 - Adjusts the clock rate to be sent on the MIDI DIN 1 port.
- MIDI DIN 2 - Adjusts the clock rate to be sent on the MIDI DIN 2 port.
- CV/GATE - Adjusts the clock rate to be sent on the CV clock output port.
- MIDI USB HOST - Adjusts the clock rate to be sent on the USB host port.
- MIDI USB DEV - Adjusts the clock rate to be sent on the USB device port.
- MIDI Clock Source - Selects the clock source for MIDI clock input.
- INT - Use the internal clock.
- DIN IN - Use the DIN IN jack.
- USB HOST - Use the USB host port.
- USB DEV - Use the USB device port.
- Scene Change Sync Mode - Selects the behaviour of scene changes.
- Beat - The scene change will take place at the next beat time.
- Track 1 End - The scene change will take place at the end of the track 1 loop.
Notes about Syncing CARBON to other MIDI Clocks
Before trying to sync CARBON to another device, first ask yourself whether this is really what you want to do. It's probably easier to sync other devices to CARBON. The only major use case where you might want to have CARBON follow another clock is for syncing with computer music software, which often has poor / no external clock syncing capability.
Also, please make sure you understand how MIDI clock works and how to set it up in your device or program of choice. Most questions about sync problems turn out to be a wrong software setting. Sending MIDI clock is almost always an option that defaults to off.
Important points about MIDI syncing:
- You must enable clock receiving on the port that you wish to use. Use the MIDI Clock Source option in the CLOCK menu.
- Many computer programs generate poor quality MIDI clock, especially at startup. If at all possible, enable the clock to send continuously even when the playback in the clock master is stopped. This will enable smoother start of playback.
- MIDI uses a clock rate of 24 pulses per quarter note. CARBON internally uses 96 pulses per quarter note for improved accuracy. Thus you cannot use individual clock ticks to advance the sequencer like you might be able to do on analog step sequencers.
- A rapidly changing clock rate or missing / extra clock ticks may cause unpredictable behaviour.
- Song Position Pointer (SPP) reception is not and can not be supported due to the non-linear nature of CARBON. Start from the beginning of a song to ensure both devices are in sync.
- The tempo display is dim and shows a best guess average of the received tempo. The displayed value may vary, but is not a problem with CARBON or your master device.
- When sync is lost, CARBON continues running its internal clock at the most recently received tempo.
How to Know if External Clock is being Received
When an external clock is being received, the top bar will display EXT in a green colour. Normally it is shown in a dark grey colour.
Swing Menu
The swing menu allows the clock swing to be adjusted. When swing is set to a value other than 50%, playback will have a bouncy feel. This affects any notes that are on off-beats with respect to a 1/16th note count. The clock is automatically swung so that different steps sizes for tracks and arpeggiators will swing properly even if they are not set to 1/16th notes.
- Swing - The swing percentage from 50% = no swing, to 80% = maximum swing.
Tonality Menu
The tonality menu allows you to adjust settings that affect the tonality and transposition of tracks.
Track Types
A track can be one of two types: VOICE or DRUM. This setting affects how CARBON will treat each track. Specifically it affects the following:
- Keyboard Transpose - Affects how the track responds to keyboard transposing.
- In voice mode a track will be transposed based on the keyboard transpose setting currently applied.
- In drum mode a track will not be affected by the keyboard transpose setting.
- Recording / Live Mode - Affects how the track will behave during recording or live mode.
- In voice mode, when recording, new notes will be added to the existing recording without change. When live mode is enabled the track playback will be muted.
- In drum mode, when recording, new notes will replace any of the same existing notes in the recording. When live mode is enabled the track playback will not be muted.
Scale Quantizing
Scale quantizing allows the output notes to be fitted to a specific scale or mode. Quantizing is applied after keyboard transposition but before track transposition.
Bias Tracks
Bias tracks are used to enable one track to be transposed by another. This can be used instead of song mode to cause tracks to be transposed up and down and is equivalent to using the keyboard transposing function. To use a bias track, the track doing the biasing should be running at a step length longer than the track to be biased.
Note that bias track output values are computed before any tracks are played back so it is not possible to have a biased track affect another track.
Tonality Settings
- Scale - Selects the scale or mode to use for quantizing.
- Transpose - Allows the track to be transposed up or down. Note that this setting can be controlled when no menus are active by turning the TRANSPOSE encoder.
- Bias Track - Selects which track will bias the current track, or disables biasing.
- Track Type - Sets the track to be either VOICE or DRUM type.
How Tonality and Transposing is Applied to a Track
To fully understand the tonality options of CARBON, it is important to understand how the various options are applied to notes as they pass through a track. Some combinations of usage might not make sense for your particular music-making style, but understanding how they fit together should help you to decide how to best use them.
Tracks can be used in either LIVE mode, where a keyboard can be played through a track with the track output muted, or it can be used in regular mode where track data is played back. The order in which various transpose and tonality is applied is as follows:
- Bias Track - The bias track is applied. This does not affect LIVE mode.
- KB trans - The keyboard (KB) transpose is applied to VOICE tracks only. This does not affect LIVE mode.
- Tonality - The tonality (scale) quantize is applied next. This affects track playback and LIVE mode.
- Track Transpose - The track transpose setting is applied last. This affects track playback and LIVE mode.
MAGIC Settings
The MAGIC mode (SHIFT + DIR) will seed the current notes in the selected tracks with random data. This can be useful in conjunction with the TONALITY settings to create useful melodies to get inspired by.
You can adjust how MAGIC produces notes with the following settings:
- Magic Chance - Affects how likely it is that a note will be produced. You can select a probability of 1-100%.
- Magic Range - Affects the range of possible notes that can be generated. You can select a range of 0 to 36 semitones plus or minus middle C. This means that a range of 0 will only allow middle C to be generated, and a range of 36 will allow notes up to 36 semitones higher and lower than middle C to be generated.
MIDI Remote Control of CARBON
Many parameters of CARBON can be controlled via MIDI in real-time. This allows you to map your MIDI controller to various functions for convenient use, or to control CARBON from MIDI software on a computer.
To use the MIDI control functions you must enable the MIDI Rmt Ctrl function in the System menu. With this mode enabled you can use your keyboard or computer to control various real-time functions of the sequencer.
MIDI Channels
MIDI channels 10-16 are for use with the MIDI remote control functions. Your keyboard or computer must be set to one of these channels. Many keyboards default to MIDI channel 1, which can only be used to control the live and transposing functions of CARBON, not the remote control functions. Refer to the manual for your keyboard on ways of adjusting the channel.
| Channel | Remote Control Function |
|---|---|
| 10 | control the currently selected track(s) |
| 11 | track 1 control |
| 12 | track 2 control |
| 13 | track 3 control |
| 14 | track 4 control |
| 15 | track 5 control |
| 16 | track 6 control |
Note Control
Note on messages are received omni and can be sent on any channel from 10-16. These messages are used to control the running state of the sequencer.
| Note Number | Note Name | Function |
|---|---|---|
| 24 | C1 | trigger scene 1 |
| 26 | D1 | trigger scene 2 |
| 28 | E1 | trigger scene 3 |
| 29 | F1 | trigger scene 4 |
| 31 | G1 | trigger scene 5 |
| 33 | A1 | trigger scene 6 |
| 36 | C2 | reset track 1 |
| 37 | C#2 | run |
| 38 | D2 | reset track 2 |
| 39 | D#2 | stop |
| 40 | E2 | reset track 3 |
| 41 | F2 | reset track 4 |
| 42 | F#2 | reset |
| 43 | G2 | reset track 5 |
| 45 | A2 | reset track 6 |
| 46 | A#2 | record |
| 48-72 | C3-C5 | keyboard transpose -12 to +12 semitones |
CC Control
All CC control messages are specific to a channel and thus it matters to which channel the messages are sent. When sent to channel 10, all tracks will be adjusted. When sent to tracks 11-16, track 1-6 (respectively) will be adjusted.
| CC Number | Function | Value Range |
|---|---|---|
| 16 | step length | 0-127 = 32nd to whole |
| 17 | track transpose | 0-127 = -24 to +24 (0 at val 64) |
| 18 | track mute | 0-63 = off, 64-127 = on |
| 19 | start | 0-127 = position 1-64 |
| 20 | length | 0-127 = length 1-64 |
| 21 | playback dir | 0-63 = off, 64-127 = on |
| 22 | gate time | 0-127 = 1-200% |
| 23 | pattern type | 0-127 = type 1-32 |
| 24 | arp enable | 0-63 = off, 64-127 = on |
| 25 | arp type | 0-127 = type 1-16 |
| 26 | arp speed | 0-127 = 32nd to whole |
| 27 | arp gate time | 0-127 = min to max |
| 80 | run/stop | val: 0-63 = stop, 64-127 = run |
Interface Mode
CARBON supports different types of configurations with its built-in USB, MIDI and analog ports. No matter what your setup looks like we are confident you will be able to connect your gear easily with CARBON.
There are two modes that you can use with CARBON: sequencer mode and interface mode. In sequencer mode all the built-in functions of CARBON can be used. You can use the sequencer, route live MIDI from your keyboard to your instruments, use the arpeggiators and so on. In this mode most of the USB ports presented are not used.
In interface mode you can use CARBON as a USB interface for your computer. You can route signals between the USB device connection and the MIDI ports, the analog CV/gate and clock ports, and the USB host port. This means you can leave CARBON connected when you want to use MIDI devices from your computer.
In both cases the USB device shows up as a number of MIDI ports when connected to a computer. Because not all operating systems can display unique port names from a class-compliant MIDI device, we present the ports in the order they appear on the device. These should match the list of devices presented on your computer.
USB Device MIDI Port Mapping
| MIDI Port | Sequencer Function | Interface Function |
|---|---|---|
| USB OUT 1 (from PC) |
|
|
| USB OUT 2 (from PC) | unused |
|
| USB OUT 3 (from PC) | unused |
|
| USB OUT 4 (from PC) | unused |
|
| USB IN 1 (to PC) |
|
|
| USB IN 2 (to PC) | unused |
|
| USB IN 3 (to PC) | unused |
|
Interface Mode
The interface mode is a special mode that allows you to send and receive data between a computer and connected MIDI instruments while CARBON is not in use. To enter this mode press the power button once while CARBON is on. The screen will turn off and the encoders will show a purple colour indicating that interface mode is active.
By using the table above you can select which ports to use to send and receive MIDI messages through CARBON to your various devices. You can even use the control panel and LEDs on CARBON with your own software. Buttons and encoders send CC messages. LEDs including the encoder backlight respond to CC messages so that you can set them via MIDI from your computer
Using the CV/Gate Outputs in Interface Mode
When using the CV and gate outputs in interface mode, the output modes and channel assignments are completely unrelated to any settings from songs within the CARBON sequencer. This enables you to use the CV and gate outputs completely independently when using them from a computer. Program change messages can be used to select different mode combinations. Several CC messages are also supported which allow the clock rate and pitch bend range to be adjusted. All of these settings are stored in the internal memory and recalled automatically each time the unit enters interface mode.
USB OUT 1 from the computer is used to control the CV/Gate outputs. Messages which affect the CV/gate settings can be sent to channels 1-4. When sending output messages like notes or CCs, MIDI channels 1-4 correspond to output pairs A-D respectively. Use the table below to determine which output configuration matches your needs and send the corresponding program change message to activate this setting.
The pairing modes (ABCD, AABC, etc.) are used to group outputs together to offer different effects like duophonic or polyphonic performance. When using ABCD mode each output is independent. When using a mode with two or more letters the same such as AABC, AABB or AAAA, notes and velocity outputs are assigned according to a polyphonic voice assignment scheme.
Actual CV and gate outputs are counted from 1-4 depending on the output mode. Each output pairing mode (i.e. ABCD or AABC) has four output assignments which correspond to the physical CV/gate outputs 1-4 in each configuration. For instance if you are using AABC mode, the physical CV/gate outputs would be assigned as follows:
- CV/gate 1 = A (first channel)
- CV/gate 2 = A (second channel)
- CV/gate 3 = B
- CV/gate 4 = C
CV and gate outputs are always assigned together. For notes and velocity outputs the gate will always act as the note gate control. For CCs the gate acts as an on/off output depending on the value of the CC. Values of 64 or higher will turn the gate output on, otherwise it will be off.
Analog Output Settings Adjustable via CC
The following functions of the analog outputs can be adjusted via CC messages:
| CC Number | Function | Value Range |
|---|---|---|
| 20 | CV bend range | 0-11 = bend range of 1-12 semitones |
| 21 | clock output / divider |
|
CV/gate Output Pairing Assignments via Program Change
| Program | Output Pairing | Output Assignments | |||
|---|---|---|---|---|---|
| Program 1 | ABDC | A = NOTE | B = NOTE | C = NOTE | D = NOTE |
| Program 2 | ABDC | A = NOTE | B = VELO | C = NOTE | D = NOTE |
| Program 3 | ABDC | A = NOTE | B = VELO | C = NOTE | D = VELO |
| Program 4 | ABDC | A = VELO | B = VELO | C = VELO | D = VELO |
| Program 5 | ABDC | A = NOTE | B = NOTE | C = CC 1 | D = CC 16 |
| Program 6 | ABDC | A = NOTE | B = VELO | C = CC 1 | D = CC 16 |
| Program 7 | ABDC | A = NOTE | B = CC 16 | C = CC 17 | D = CC 18 |
| Program 8 | ABDC | A = CC 1 | B = CC 16 | C = CC 17 | D = CC 18 |
| Program 9 | AABC | AA = NOTE | B = NOTE | C = NOTE | |
| Program 10 | AABC | AA = NOTE | B = NOTE | C = VELO | |
| Program 11 | AABC | AA = VELO | B = NOTE | C = NOTE | |
| Program 12 | AABC | AA = VELO | B = VELO | C = VELO | |
| Program 13 | AABC | AA = NOTE | B = NOTE | C = CC 1 | |
| Program 14 | AABC | AA = NOTE | B = VELO | C = CC 1 | |
| Program 15 | AABC | AA = NOTE | B = CC 1 | C = CC 16 | |
| Program 16 | AABC | AA = VELO | B = CC 1 | C = CC 16 | |
| Program 17 | AABB | AA = NOTE | BB = NOTE | ||
| Program 18 | AABB | AA = NOTE | BB = VELO | ||
| Program 19 | AABB | AA = VELO | BB = VELO | ||
| Program 20 | AAAA | AAAA = NOTE | |||
| Program 21 | AAAA | AAAA = VELO | |||
MIDI Button, Encoders and LED Control
Pressing buttons and turning encoders on CARBON while in interface mode will send MIDI to the connected computer on USB IN 1. Sending CC outputs on USB OUT 1 (the CV/gate output port) can be used to control LEDs on the panel.
Panel Control Data Format:
- Buttons - sends CC value on channel 16 - value: 0 = release, 127 = pressed
- Encoders - sends CC value on channel 16 - value: 1 = up, 127 = down
- Single LEDs - receives CC value on channel 16 - value: 0 = off, 127 = on
- Encoder RGB Backlight - receives CC value on channel 16 - value: bits 2:0 = RGB state
|
|
||||||||||||||||||||||||||||||||||||||||||||||||||||||||||||||||||||||||||||||||||||||||||
Tips and Tricks
Here are some ideas from Kilpatrick Audio and generous users who have emailed us. Try some of these to get more out of CARBON.
How to use the Arpeggiators Efficiently
The best way to set up an arp is to use LIVE mode to try it first. Set the speed and type the way you want it. To save a lot of notes on your track, use the slowest step length possible for a track. Try using whole notes. Record or edit a chord on each step and make sure the ARP is enabled when you play back.
Quickly Mute and Unmute Tracks
Remember that you can hold SHIFT and press the select buttons to mute and unmute tracks.
Use a Second Track for Analog Accents
Want to add more spice to your performance? Use a second track full of notes to add accents. Chose an interesting pattern type and patch the GATE OUT to the VCA or filter in your modular. The added 5V pulses can be used to adjust the volume or cutoff frequency of a part playing on another track.
Use Split Keyboard Mode with a Monosynth
Set up LIVE on two tracks. Set the keyboard split so each hand outputs on a different track. Route one track to control pitch and gate, and another track using the CV OUT to control another parameter on your synth. Use an arpeggiator on one or both tracks to add more colour to your performance.
Updating Firmware over USB
CARBON receives occasional updates which add features and improve performance. While it is not necessary to update CARBON, you might find some of the new features useful. Any CARBON currently running version 1.18 or lower uses the old DFU bootloader method and must have our new bootloader installed to receive updates. We now use a completely web-based firmware update tool that does not require any drivers or software to be downloaded.
To check your current firmware version hold SHIFT and press SYS to see the version number on the screen.
USB Host Port Details
We strive to make solid and reliable products that are compatible with other devices. Unfortunately USB is an annoying and complex protocol that is hard to get right. Indeed after 20 years in common use, USB still continues to cause problems even on the most mature operating systems.
CARBON was built from the ground up, and this includes both the USB device and host drivers. We rely on specific hardware features and code provided by the CPU vendor, as well as our own custom class-compliant USB MIDI code that sits on top and does MIDI things. The USB host hardware and code supplied by our CPU vendor has turned out to be a source of frustration for us. We managed to get it working fairly well, but it still has some issues which are being addressed.
The current situation is detailed below:
- CARBON has been tested and known to work with devices from Korg, Roland and M-Audio. These devices were used during development and have suitable performance. We expect that most devices from these manufacturers will probably use similar implementations and work acceptably.
- The only issue that we have been able to reproduce so far in our lab involves device enumeration. That is, detection during plugging in of a device. Sometimes the device fails to be set up correctly. In older firmware versions this could cause the system to appear unresponsive until power cycled.
- We have had reports of certain devices working erratically or not at all. Some devices from DSI do not seem to work properly with CARBON.
- We have had reports of users who apparently have USB 3.0 MIDI devices. CARBON only supports Full Speed USB devices which following the USB 1.1 MIDI class spec.
- As mentioned at the beginning of this document, devices which have internal USB hubs and/or show up as multiple devices at once cannot be used with CARBON.
Due to hardware limitations in the CPU used to build CARBON, supporting USB 2.0 High Speed devices such as devices which support both audio and MIDI functions is not possible. Simple devices like USB MIDI keyboards and single-port MIDI interfaces are the intended use of the host port, and we believe that most of these should work well.
Need Help?
Feel free to contact us for more information, to report errors or unclear sections, or to request specific information be added to this manual.