

PHENOL Mods
One of the best things about analog electronics is the ability to easily discover new possibilities. We aim to provide a list of useful modifications that can help you get even more out of your PHENOL. If you come up with something interesting please send us a picture, a short description and a link to a video or audio recording of the result.
Important! Opening or modifying your PHENOL will void the warranty! We are fair in providing repairs for customers when it's clear that a problem is our fault. But if you break your synth, we can't be held responsible and there may be a charge to repair it. By undertaking any of these mods you acknowledge that you take responsibility for anything that might happen to your synth, or yourself as a result.
How to Open Your PHENOL
It's important to open your PHENOL correctly to avoid damage to the rear panel jacks and other components. Please follow the steps below:
- Remove the 5x jack nuts on the bottom cover. These are only finger tight.
- Place the PHENOL face down on a soft surface like bubble wrap or a foam. The jacks should be facing away from you.
- Remove the 5x screws on the bottom cover. Be careful not to lose the washers.
- Slowly lift the bottom cover away from the panel on the side toward you. Insert a few fingers between the cover and the panel. The cover should be just above the inner PCB.
- Press on the 1/4" rear panel jacks with one hand as you slide the cover backwards with the other hand.
- Carefully remove the cover. Note that there are two wires soldered to the PCB. You can unsolder these if you want more freedom when working on PHENOL.
- PHENOL can now sit on its internal standoffs and should be safe to use in the normal orientation. Be sure no tools or metal parts come in contact with the PCB when it is not protected by the rear cover.
How to Solder onto Tiny Pins
Other than connectors and controls, PHENOL is made with almost entirely surface mount technology. (SMT) This can be daunting at first, but is actually far easier to prototype with than through-hole. Swapping parts is fast and easy and doesn't ruin the board even after changing parts many times.
There are many excellent videos online showing various hand-soldering techniques for surface mount parts. A big screwdriver-shaped soldering tip works best because you can heat both sides of a resistor or capacitor at the same time and lift it off with tweezers. But keep in mind that to remove ICs with more than a few pins a hot-air rework station is needed.
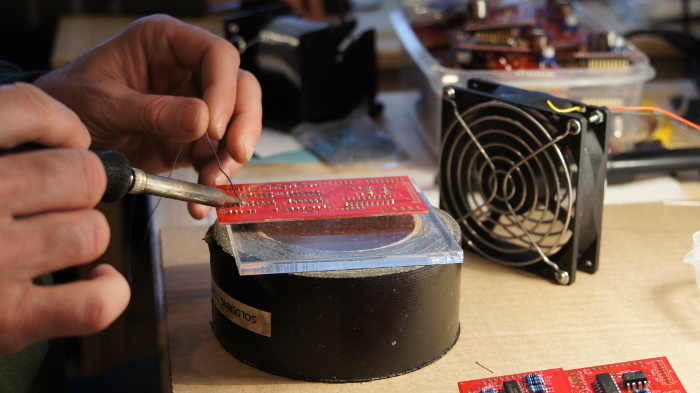
To add through-hole components as shown below, the easiest way is to simply add a bit more solder to the pads you intend to attach to. You can also trim the ends of the resistor leads and tin them a bit too. Then just tack the part in place. You will want a small set of needle nose pliers or tweezers for this. Be sure that the leads on the part do not touch any other metal parts.
Note: PHENOL is made completely with RoHS-compliant lead-free solder. You should avoid using lead-based solder when making repairs or modifications. We recommend MG Chemicals 4900 series lead-free solder containing silver. It's the best type we have used so far.
High Pass Filter Balance Mod
Some people have noted that the PHENOL high pass filter sounds more like a band pass. That's because although it sounds great, it is not really a true high pass filter. We originally started with a high pass, but after massaging the circuit, the filter that you hear was the result. Because of the great sound, it never occurred to us to call it something else!
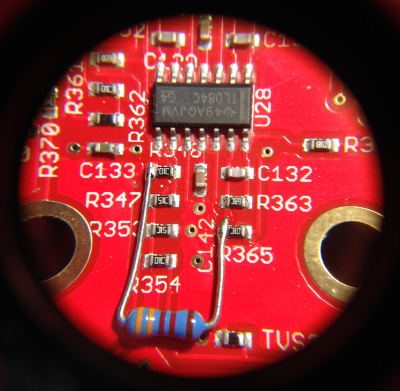
But maybe you want a bit more of a high pass function? No problem, we worked out a very simple way that you can adjust the sound by adding a single resistor. Have a look at the picture below. A 33.2K resistor (1% tolerance, although 5% 33K will do) will add some extra high pass signal into the output. Using a lower value (down to about 10K or so) will produce a more pronounced effect.
Does it sound better? In my honest opinion, not to me. I like the sound of the stock filter more, but there are infinite variations possible of even this filter circuit. That's what creating and exploring is all about! - Andrew Kilpatrick (July 2015)
More Ideas?
Hack in a trim-pot in series with a resistor. The minimum resistance should be around 10K or so to prevent overloading the output.
Eurorack to PHENOL!
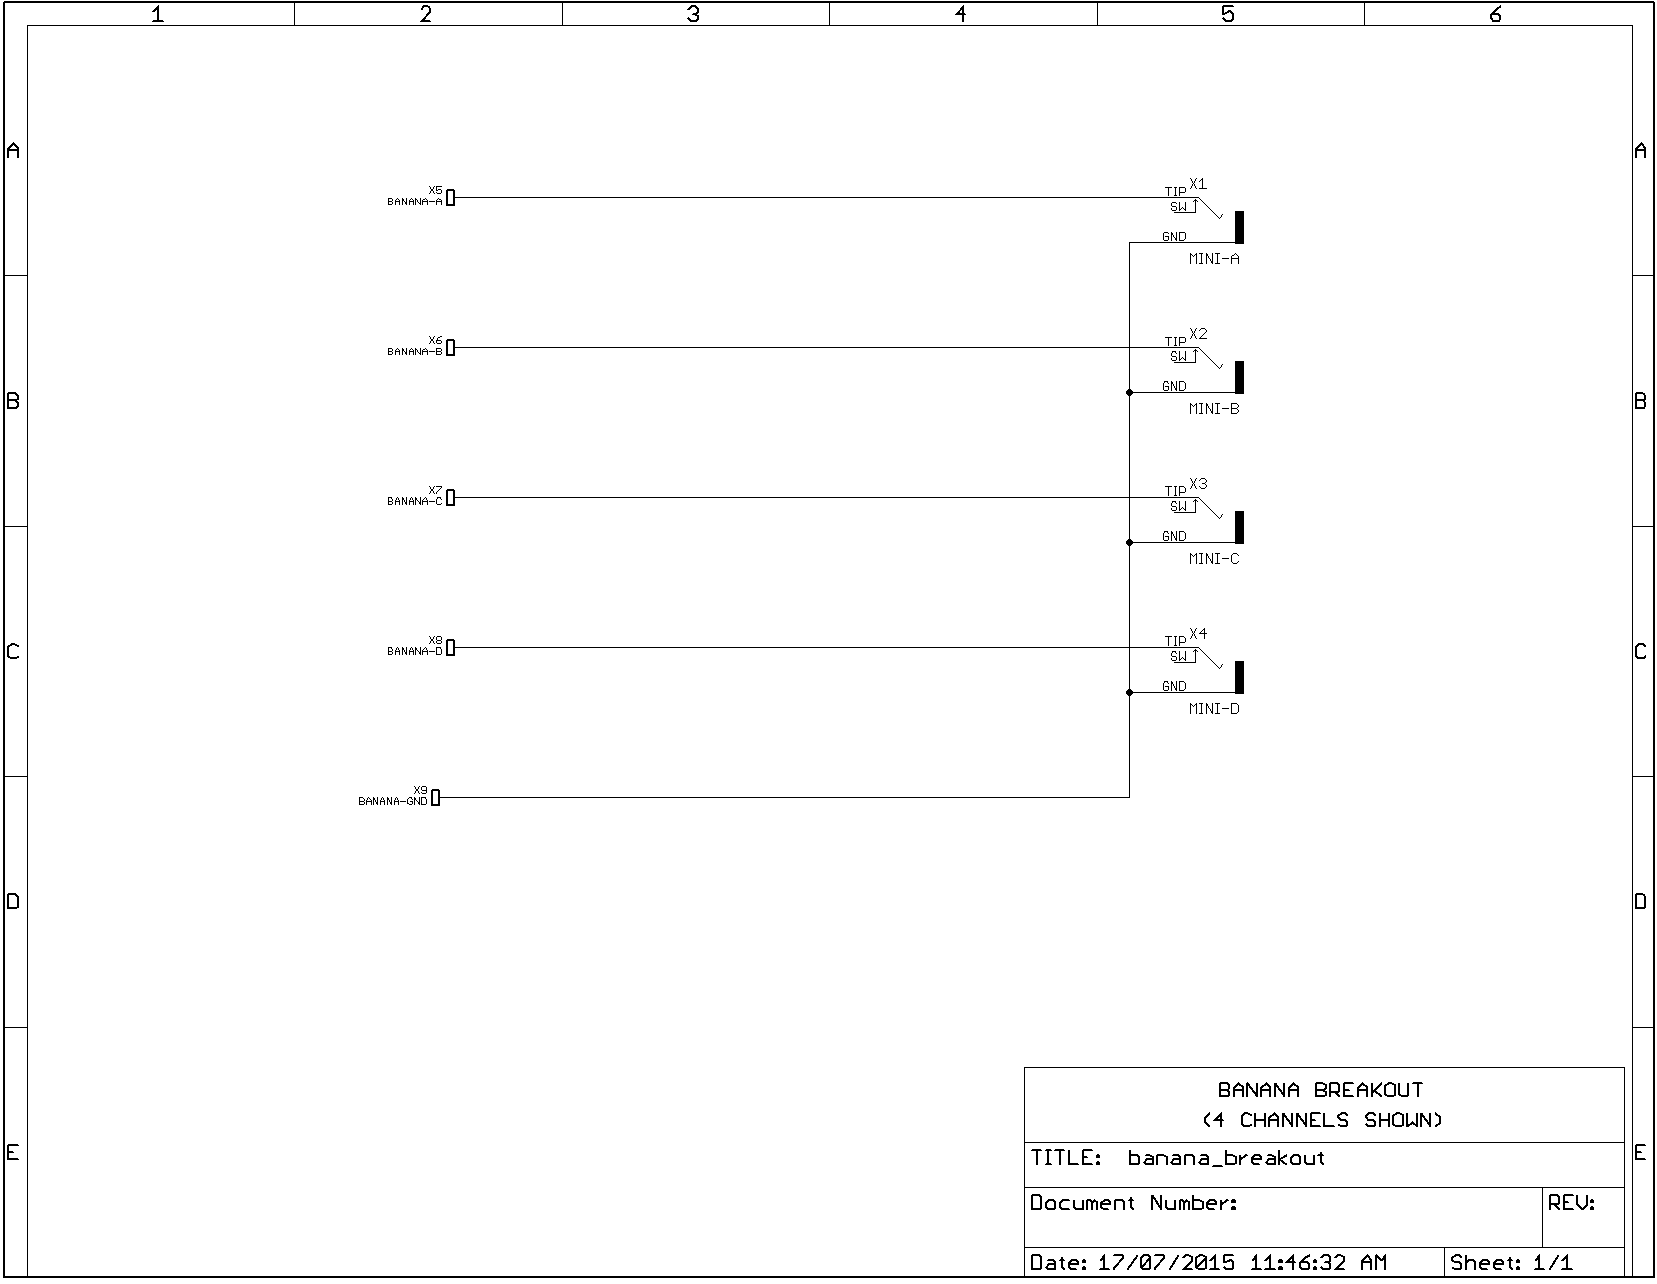
Banana to Minijack Breakout
Many people have asked about interfacing PHENOL to other modular gear, especially Eurorack systems. A simple module can be made with some minijacks and banana jacks, both of which are easily available at your local electronics store or online.
Note: We also sell packs of Banana to Minijack Adapters which perform the same function as this mod.
Check out the image below for an idea of how to do it. The banana ground jack connects all the minijacks to the same ground reference as PHENOL. This prevents damage to either the Eurorack synth or PHENOL and provides a return path for the signal. (as banana cables are only a single wire) Then you can patch with banana cables and minijack cables as you like.
One potential point of improvement is to connect a ground wire to the power supply of the Eurorack synth. If you make a module, this could be as simple as adding a 10 or 16 power cable and using only the ground pins from it. This ensures that when plugging and unplugging the minijack cables, the ground is not interrupted. This might not be needed though, but it's just a thought.
Click here for an example schematic.
Want more?
Share your mods with us or ask us and we might be able to help you!